
Direct connection mode
Basics
SkyServer mode is a very robust method of connecting. However, it doesn’t work for 100% of cases. If you cannot connect using SkyServer mode, you can try Direct connection.
For this method, you should be able to set-up a direct connection between two computers. This usually means fiddling with your LAN settings on your router and configuring port forwarding. There are two ways to establish a connection.
Direct connection using port forwarding or UPnP

- the user who wants to be a server should have a static external IP address accessed from the internet (this is an IP address which your internet provider assigns to your home router. To find this address visit http://www.get-myip.com or similar websites). In the above example, this is 65.25.48.198
- it is enough to have the static external IP only for the user who is a server
- the user who is the server should port-forward his local SmartCopilot port to his home router. It could be done in a fully manual way or using UPnP feature of the home router
- UPnP should be enabled in the home router settings (it is always disabled by default)
- if port-forwarding is done, the client should be able to initiate the connection to the server using server’s external IP address and external port (in case of UPnP the same port of SmartCopilot setup – in the example above this is 58000)
If there is no external IP or port-forwarding could not be done (including UPnP), try to setup server for the second pilot. If the second pilot cannot set up himself to be a server too, there is one remaining way of using VPN providers like Hamachi, etc. Next picture shows how to find server-client configuration:

Server-Client decision flow chart
Server – Client understanding
Server-Client both are networking names for connection partners. In our case:
- the Server is the SmartCopilot user who sets up his SmartCopilot plugin to be accessed from the internet using his external IP address and port. After the server starts it waits for the incoming connection request from the client
-
the Client is the SmartCopilot user who initiates connection (pressing Connect) to the server. The client should know the server’s external IP and port and should enter his data in own Direct Connections window. To access the server a port-forwarding on the client side is not necessary (but could be done if client wants to be a server for another potential connection session)
How Master-Slave status depends on Client-Server role of users:
- the Master-Slave status is always defined by the SmartCopilot client. It means the user who initiates connection should define Master-Slave status before pressing Connect
- after server user accepts incoming connection his Master-Slave status will always to be opposite to client’s one
Connection via VPN
If there is no external IP available or port-forwarding (including UPnP) could not be done, try to setup server for the second pilot. If the second pilot could not set up his server side too, there is one remaining way of using VPN providers like Hamachi etc.:
- unstable, low-speed connection for many free VPN providers
- easy to configure
- after users established their VPN connection they should select VPN interface (i.e. Hamachi IP address) in SmartCopilot setup window
- direct connection using partner’s VPN IP address
Connection via VPN

List of partners
In direct connection mode, you can save connection data for all your partners. On the screenshot below, you can see the list of connection partners. Here could be entered up to 32 records. Select the user you want to connect to:
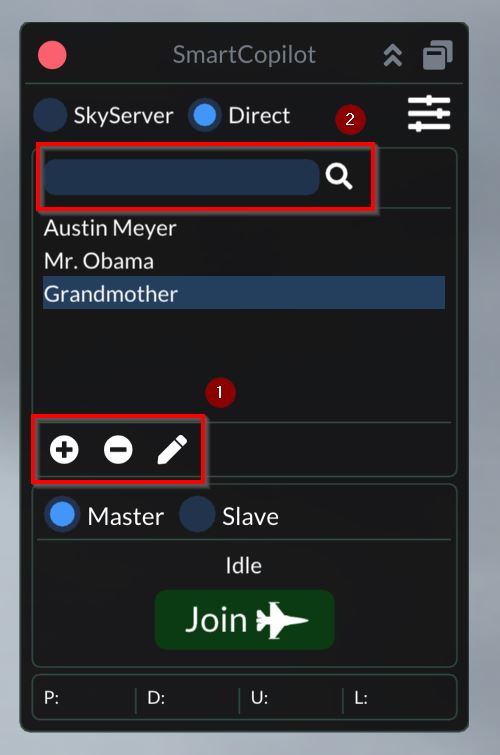
On the bottom of the list, there are three buttons to create, delete, and edit the connection. Press plus button and enter the connection data of your new partner:
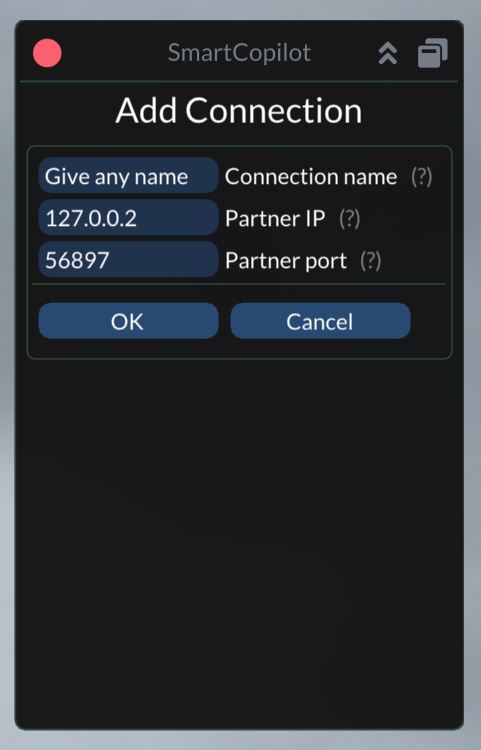
Here are three fields:
- Connection name field – a free name to describe the connection
- Partner IP field is the external address of your partner (is a server IP you connecting to)
- Partner port field is the UDP port of your partner (normally is the port entered in your partner’s Settings window)
After entering the connection details, press OK button and press Join.